_1.avif)
Who is this article for?
🗣️ UI subscription owners (aka "admins")
⭐ Recommended for all teams using Research Hub
If you’ve landed on this guide, it’s likely because you’ve been assigned as the account owner (or “admin”) for your team’s Research Hub subscription.
An admin is the person responsible for setting up and managing User Interviews for your team. Every team needs an admin, whether it comprises a lone UX researcher, a mix of product managers and designers, or a dedicated research ops manager controlling panel access for a large enterprise team.
This guide will teach you everything you need to know as the Hub admin for your team, including:
- What is an account admin?
- What are admins responsible for?
- What tips and strategies should admins use to keep their team on track?
What is a UI account admin?
An account admin is the person who owns and manages their team’s Research Hub subscription. Admins must make important decisions regarding their panel’s implementation, long-term strategy, and internal enablement.
Anyone can be an admin, but it’s often the lead researcher or a Research Ops Manager who has the best understanding of their team’s needs and use cases for User Interviews.
Is an account admin the same as a team admin in Hub?
Not necessarily. A team admin is one of the three roles (team admin, researcher, and teammate) we currently offer to help you manage user access and permissions in User Interviews. Team admin roles have advanced access privileges and customization permissions and are only available on Hub Premium and Enterprise plans. To learn more about team admins and other roles in this context, check out this article.
An account admin (which is the intended audience of this article) is the person who owns your UI subscription and acts as the main point of contact for your assigned CSM or PC from User Interviews. The account admin is responsible for strategic decisions and approvals related to your UI account (including role assignment). Every team, regardless of size, role, or pricing plan, needs an account admin.
What are account admins responsible for?
In a nutshell, admins are responsible for setting up their Research Hub account and enabling their team to use Hub successfully. Here’s a breakdown of admin responsibilities both during implementation and on an ongoing basis.

During implementation
- Upload participants and customize Hub data fields: Add participants to your Hub panel (with a CSV, opt-in forms, study invites, or the API) so you can start running studies. You can map many kinds of data into custom fields, so think carefully about the data points your team might need to effectively filter, segment, and organize your panel. Learn more about building your panel.
- Set up roles and permissions for your team: Roles and permissions help you democratize research safely and prevent team members from making unauthorized changes. If you do not specify roles for your team, every user will have Team Admin permissions by default. Learn how to set up roles and permissions (note: this feature is only available for premium and enterprise accounts).
- Create templates for emails and landing pages: As an admin, you can set default templates for emails, projects, and landing pages to standardize branding across all team members. Before you can designate default templates for your team, you need to create the templates. Learn more about setting up default templates in Hub.
- Configure communication settings and guardrails: Authenticating your domain, creating sender profiles, activating a data consent notice, and setting up guardrails like invite rules all allow you to enforce consistent, professional communication across all team members—without having to dedicate training and oversight to every message sent through UI. ✍️ Note that setting up an authenticated domain can take some time and often requires you to loop in IT or other teams to help out, so it’s important to be aware of this and start the process as early as possible.
- Review and sign off on the initial Hub setup: Prior to the full team rollout, you’ll need to review your Hub setup and sign off on it. This is a key milestone allowing your team to “graduate” from the onboarding process and hit the ground running with your freshly populated Hub panel. Check out the “What tips and strategies should admins be aware of?” section to understand what to look for during this review.
On an ongoing basis
- Make decisions regarding your long-term panel strategy: Our most successful customers build their Hub panel with the future in mind. This means building your panel with the right users, creating user segments and updating them as needed, periodically cleaning and updating user data to sustain your team’s research needs right now and in the future. Consider both your current needs and how those needs may evolve over time when defining your strategy. Learn more about the Hub pyramid model in the next section.
- Monitor team usage and spend metrics: Our Reports page gives insight into your team’s completed sessions, the total costs associated with those sessions, and overall team activity. As the account admin, you should keep an eye on these numbers to ensure your team stays within budget. Learn how to access team reports.
- Train and enable other team members: When Research Hub is first introduced at your company (and later, when new team members join), you’ll need to provide training to ensure best practices across all researchers. It’s helpful to provide your team with documentation on key panel information, like who’s in your panel, how to find and use segments, how to launch projects, different options for inviting participants to studies, and preferred research methods in your org.
- Act as the person of contact for your User Interviews CSM: Admins act as the person of contact between Hub subscription teams and UI. This means that you’ll need to manage communication between your team and your CSM, as well as help coordinate onboarding and training.
- Share product feedback by opting into UI’s customer feedback panel! As you’re getting to know User Interviews, we’d love to hear your feedback on what’s working, what could be improved, and what you’d like to see on our product roadmap. Fill out this form to join our feedback panel and shape the future of research recruitment.
What tips and strategies should admins be aware of?
As you know, best practices are developed through years of experience, research, and a bit of trial-and-error. By following established best practices for panel management with Research Hub, you can benefit from the collective wisdom of our users, avoiding common pitfalls and ensuring high-quality outcomes.
The key things you should be thinking about include:
- Your long-term vision for panel management
- How to determine what contact fields and user segments you want in Hub
- Strategies for keeping your user data clean and updated
- When and why invite rules and limits are essential
- How to keep your panel engaged to facilitate better response rates
- How to manage compliance and security
- Strategies for training and enforcing protocols on your team
⏳ The importance of long-term thinking for panel management
Our Hub Pyramid model demonstrates four effective approaches to panel management with Research Hub, which build on each other as your research practice matures.
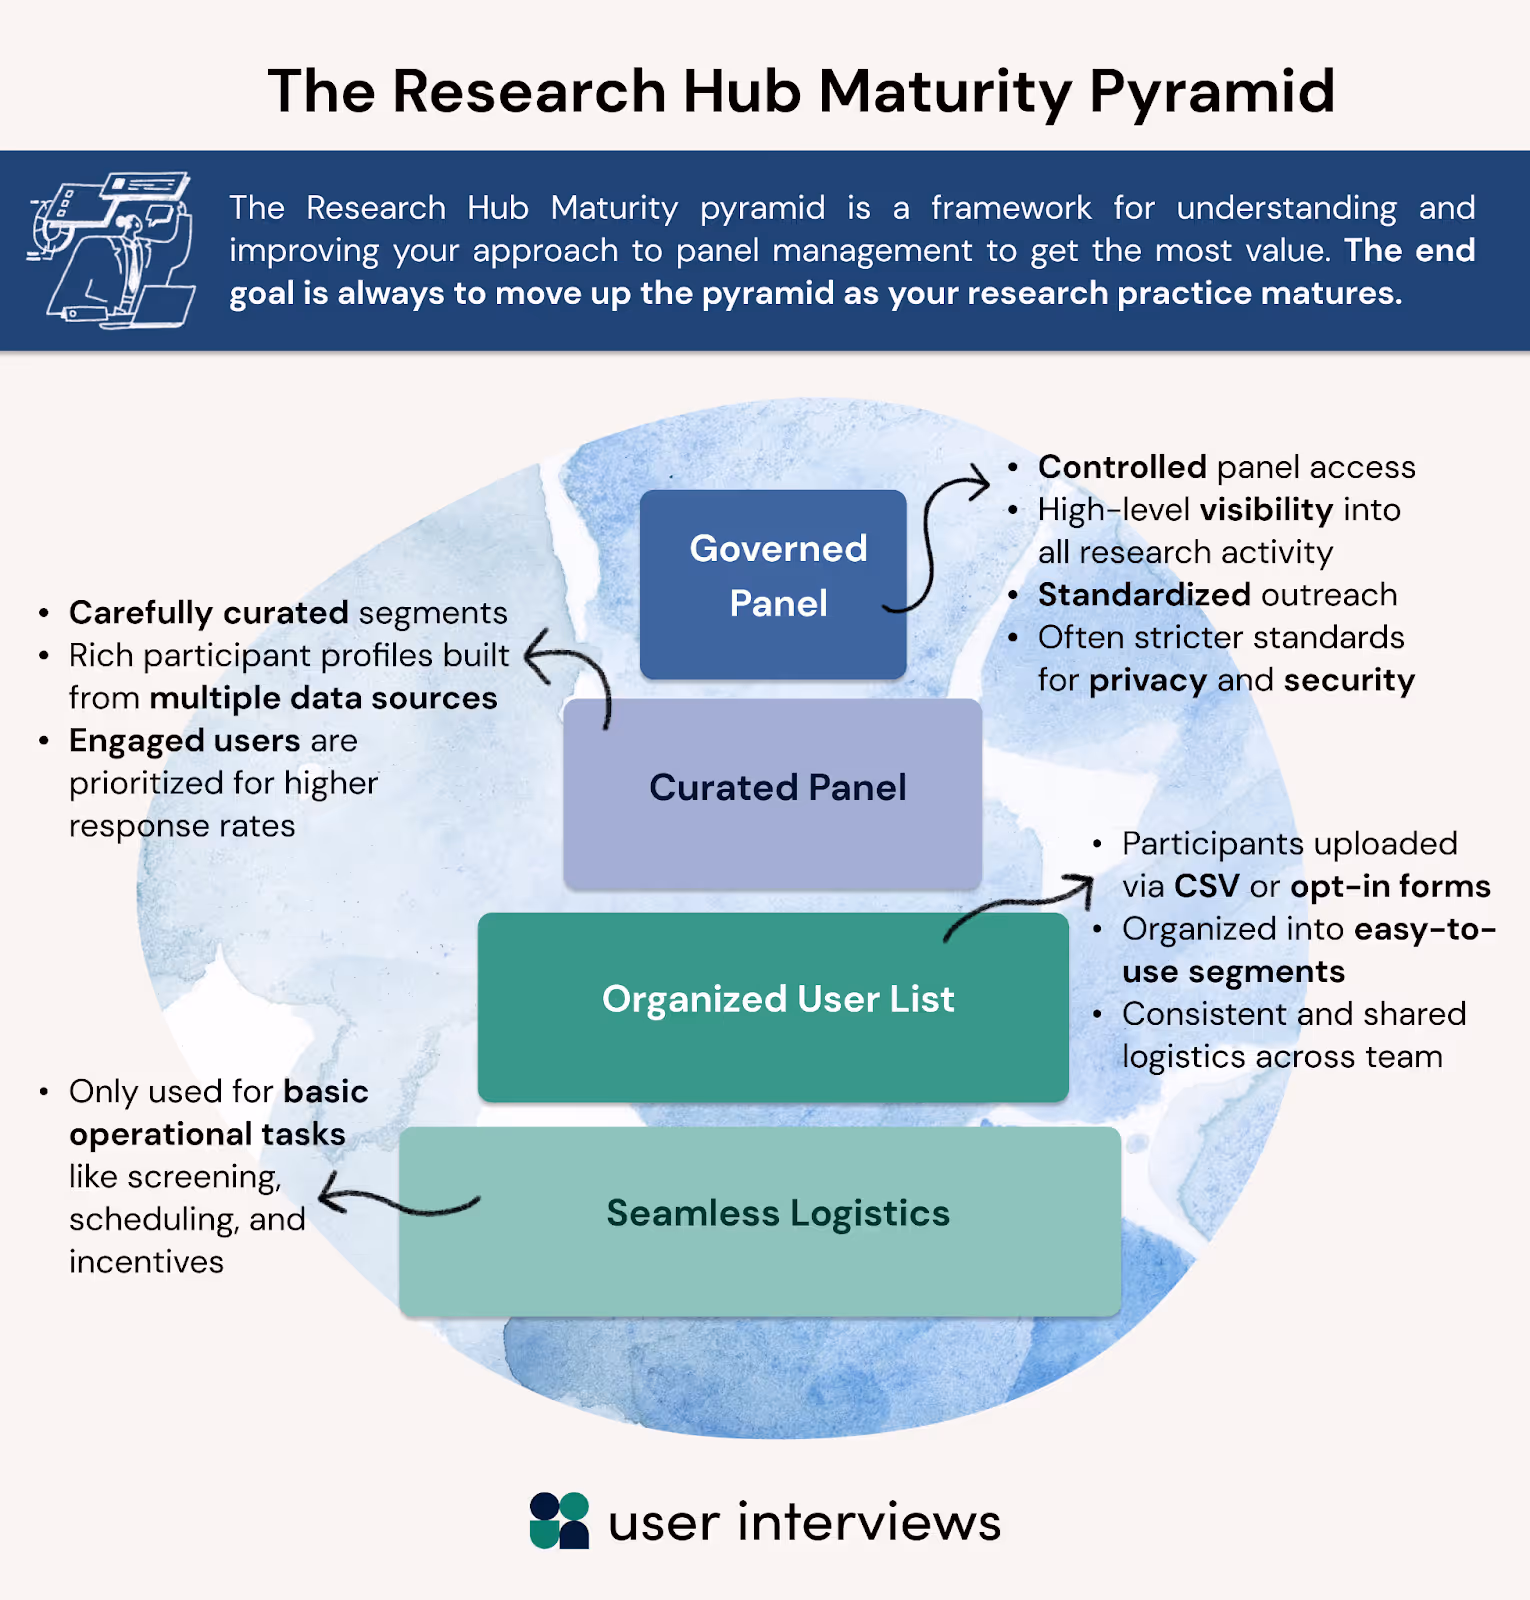
The pyramid levels, in order of increasing maturity, are:
- Seamless logistics: At the most basic level of the pyramid, teams use Research Hub only for the seamless logistics it provides for operational tasks related to recruitment. These tasks include screening, scheduling, communication, document signing, and incentives.
- Organized user list: At the next level of the pyramid, teams upload participant data to the panel from CSVs or use opt-in flows to acquire participants, organize participants into easy-to-use segments, and use Hub to facilitate consistent and shared logistics across the team.
- Curated panel: At this level of the pyramid, teams more carefully curate their segments and filters to organize their panel by personas or other important criteria for quick invitation/vetting processes. Many teams pull together multiple data sources to build rich profiles for each participant and prioritize the most engaged users to facilitate better response rates.
- Governed panel: At the highest level of the pyramid, teams control access to the panel to ensure high-level visibility into all research and standardized outreach. These teams may also have stricter guidelines they need to follow for user privacy and security and take advantage of additional features like PII restrictions, permissions, and team default settings.
As you’re setting up your Hub panel, it’s important to think beyond your current projects toward a more sustainable panel investment as your team and research practice grow. At the point of implementation, your team may fall into any level of the Hub pyramid, but the goal is typically to move up the pyramid to improve your efficiency and effectiveness over time.
While it may seem easiest to get started with the project-by-project approach without thinking about long-term panel needs, it can be difficult to clean up an unmaintained panel with stale or disorganized data. A better approach is to implement some aspects of organization, curation, and governance early on to save you time and headaches in the future.
📊 How to determine what fields and segments you want in Hub
As you’re uploading participants to your Hub panel, you’ll have the option of creating custom data fields. Email addresses are the only required field—this is the data point we’ll use to identify and map unique participants. At a minimum, we also recommend including fields for first and last names. These are available by default in User Interviews and allow you to send more personalized emails when inviting your participants to a project.
Beyond these foundational fields, you can also create custom fields using any of the following data points:
- Text (i.e. Premium)
- Number (i.e. 234)
- Date (i.e. 2018-08-11), Note: date columns must use the YYYY-MM-DD format.
- True/False (i.e. True)
The fields you choose to include can be used to filter, segment, and organize your panel, so consider the types of data that will be most helpful to your research team. For example, you might want to include fields to help you identify high-value users, segment users who fall into different ICPs, or identify users paying for different pricing plans or products.
Setting up a few user segments is a pivotal milestone for teams to reach and enable easy recruitment through Research Hub, so spend some time thinking about what would be useful to your team. You can even set permissions for Hub segments to restrict or limit access. Learn more about using segments in Hub to find and retarget audiences.
🧹 Strategies for keeping your panel data clean and updated
It’s natural to see some changes in your participant data over time. Some panelists will opt-out of participating in future studies, some will move or change jobs, others will drop off engagement with no explanation.
Cleaning and updating this data can help you avoid mishaps caused by inaccurate data, as well as prioritize the most engaged users to improve your study invite response rates.
There are a few different ways to update your data in Research Hub:
- The Research Hub API: The API allows you to build custom integrations with your tools of choice, whether they be CRMs, data warehouses, analytics tools, or wherever your company stores customer data. It auto-populates your panel with new users, updates data in real-time, and automatically removes inactive or unsubscribed users. If you expect you’ll need to make significant updates often, then this is your best option for efficiently, effectively, and securely keeping your data up to date.
- CSV uploads: Without the API, you also have the option to update records manually via CSV. When doing so, it’s critical to map your fields properly to avoid duplicate columns or duplicate participant profiles. Data for existing records will only be updated if there is a match with the email address, and the email column has been mapped correctly. Many teams collect updated data via screener surveys, export it from the project, then re-import as a CSV into Hub.
- Edit individual profiles: You can also edit individual participant data by viewing their profile and editing fields one-by-one. However, it’s always ideal to manage edits in bulk when possible. See the “Manage consent, user access, and participant data” section in the slide deck below to learn how to edit individual profiles.
Note that opt-in forms are best used for growing a panel, not updating panel records. If you email an opt-in form to ask that participants update their Hub information, filling out the form will not update their information in Hub.
For more information on keeping your panel healthy and up-to-date over time, check out our Ongoing Panel Management guide below.
💌 When and why invite rules and limits are essential
Invite rules are a standardized criteria you can set to make sure everyone on your team is inviting the right participants at the right time for Hub projects, while invite limits allow you to set the maximum number of invites a researcher can send per study.
These rules and limits will automatically apply to all Hub study invites sent by your team. They’re a great way to create consistency across all your team’s studies and prevent over-recruiting with your Hub audience.
Invite rules and limits are essential when:
- You have multiple researchers recruiting from your Hub panel, which risks overlap in recruiting invites
- You have a very large panel and want to ensure all engaged panel members get the chance to participate
- You have a limit on incentive amounts that panelists can earn by participating in studies
- You have any other criteria that warrants the inclusion or exclusion of specific participants from recruitment
You can set up invite rules based on activity-related criteria, participant info, or any custom fields you’ve created. For example, you could set rules to only invite participants who were last invited more than 30 days ago, haven’t completed a study with you before, haven’t been paid more than $100 in incentives, or fit your ideal participant persona based on custom field criteria.
The max invite limits you set will depend on the responsiveness of your audience. For example, if you typically receive a 10% response rate on study invites, then you’ll want to set your invite limit to 10x the number of requested participants on a project. This will ensure your team gets enough responses to fill their study, without over-contacting your audience.
✍️ Note: Invite rules are only available on Hub Premium and Enterprise plans. However, we have a default rule for all plans that doesn’t allow researchers to invite anyone who is unsubscribed.
🙋 How to keep your panel engaged to facilitate better response rates
Whether your panel comprises 100 people or 10,000 people, it’s no use if none of those people respond to your study invites.
Once you’ve done the work of building a high-quality participant panel with Research Hub, it’s important to maintain the health of your panel over time by keeping your participants engaged. As an admin, here are some of the strategies you might put in place to help your team maintain panel engagement:
- Invite rules and limits are one way to keep your Hub panel engaged by avoiding panel fatigue caused by excessive invites.
- Bulk emails allow you to keep in touch with your Hub panel outside of studies to help participants see the value of their feedback and keep them engaged for future studies. As an admin, you might want to set guidelines for when and how your team uses bulk emails to contact your Hub panel (e.g., periodic welcome emails or following up with participants from a specific study to highlight how their feedback was used).
- Consistent branding and professionalism builds trust with participants and maintains good rapport with participants long-term. You can set up customized templates like a logo, trustworthy “from” domain (e.g. research@yourcompany.com), and email invite templates to standardize communications across your team. Adding a logo and sender profile requires minimal effort, but we find that Hub teams who take advantage of our branding features receive the highest application rates compared to teams who don’t.
- Fair incentives are also crucial for keeping your panel engaged over time. As an admin, it’s important to enforce consistent, equitable incentives across all projects. Tools like the UX Research Incentive Calculator can give your team personalized, data-backed incentive recommendations for every study.
🔐 How to manage compliance and security
As you build your Hub panel, you’ll be collecting sensitive information about your participants. Protecting that information is of utmost importance. Luckily, we’ve got your back with useful privacy features built into Research Hub.
To help you remain compliant with data security regulations, we offer features that help you to collect informed consent from your panelists, control user access, and find and remove participant data when necessary.
As an admin, here are some of the things you’ll need to prepare to ensure compliance and security across your research team:
- Set up your consent notice: You can customize your consent notice to ensure it’s delivered to every participant who applies to any study run by your team. When your data consent notice is activated within your team’s consent settings, participants will be automatically prompted to give consent every time they apply to a project or fill out an opt-in form.
- Create a custom footer: If you have additional privacy information and links to share, you can create a custom footer to be displayed on all participant-facing pages. This ensures that important information is easily accessible to your participants as they navigate through any part of the Hub experience, such as filling out your opt-in form, or redeeming an incentive.
- Assign appropriate roles and permissions: To keep your participant data safe, it’s important to manage user access by setting appropriate roles and permissions for your team. Roles and permissions can help you obscure participant PII from teammates who don’t need to access it. This will ensure that all the work you’ve done to grow, update, organize, and secure your panel cannot be overridden by unauthorized users. If you don’t specify roles for your team, every user will have Team Admin permissions by default.
- Set up necessary documents like NDAs and consent forms: If you have our Document Signing Add-On, you can simply upload the documents you need to have participants sign and our system will collect signatures automatically. However, you can also manually distribute documents and collect signatures before or during sessions. Learn more about sending documents to collect participant signatures.
- Regularly remove duplicate or disengaged users: To keep your database clean and free of unnecessary participant PII, you may want to periodically remove inactive users and merge duplicate records. Duplicate records can be tricky to find, but you can start by looking for any instances of the same first and last name. You’ll need to contact the participant via Hub email to confirm their preferred email and manually delete their other record. 💡The Research Hub API can help you do this at scale.
🧑🏫 Strategies for training and enforcing protocols on your team
Among our most successful customers, team admins offer training, templates, and documentation to help the wider team improve their research workflows. If you haven’t already, you should start thinking about how to enable your team to approach research with high levels of competence and confidence.
Some common strategies for training your team on how to do research with User Interviews include:
- Internal guides: Instructional guides or “playbooks,” tailored to your company’s specific needs and use cases, are gold for encouraging your team to follow best practices. You could create these resources from scratch if you’d like, or you could adapt some of the resources that User Interviews has created for you, such as the Quick-Start Guide to Research Recruiting or one of the many instructional articles in our Help Center. If you need help customizing the quick-start guide, contact your CSM—they’ll be happy to help!
- Templates: Templates help your team create quick, on-brand, standardized resources for conducting research. In User Interviews, you can create email template sets and project templates, but you may also want to create more general templates for things like study plans and note-taking. Browse our free research templates here.
- Video tutorials: Many of our customers choose to create short walkthrough videos of various actions in the User Interviews platform. This is a great way to teach your team how to use the platform, show them exactly where different steps take place within UI, and offer team-specific tips and instructions in the video voice-over.
- Team training meetings: Live, team-wide training is also a great opportunity to teach your team how to use UI while allowing them to ask questions in-person. Your User Interviews CSM will offer some team training and enablement sessions during the onboarding process, but you may want to conduct additional training sessions on a regular basis to refresh your team’s knowledge.
These are just a few suggestions. Ultimately, the enablement program you choose should be tailored to the specific needs, goals, and makeup of your team. For example, if your team is made up of folks who do research as an adjacent function of their core role (such as UX designers or product managers), then you may want to consider offering more enablement for general research best practices than teams that are primarily full-time, professional UX researchers.
At User Interviews, our enablement program also includes monthly company-wide conversations with external researchers called Fireside Chats, blocked-out office hours for personalized coaching with our internal research lead, and a Slack channel called #research-hotline for support. Read more about our research enablement program here.
As always, our support team is here to help
As the admin for your team's Research Hub subscription, you play a crucial role in shaping the success of your research endeavors. By following the best practices outlined in this guide, you’ll be well prepared to facilitate the success of your team's research initiatives.
Remember, the key to success lies not only in addressing current needs but also in adopting a long-term perspective. As your research team and practice grow, your approach to panel management may need to evolve as well. You can save yourself time and avoid potential challenges in the future by setting the foundations for a neatly organized, well-maintained, and securely governed research panel early on.
Still have questions? Feel free to contact your CSM or PC directly, browse our researcher support articles, or fill out our support request form.


